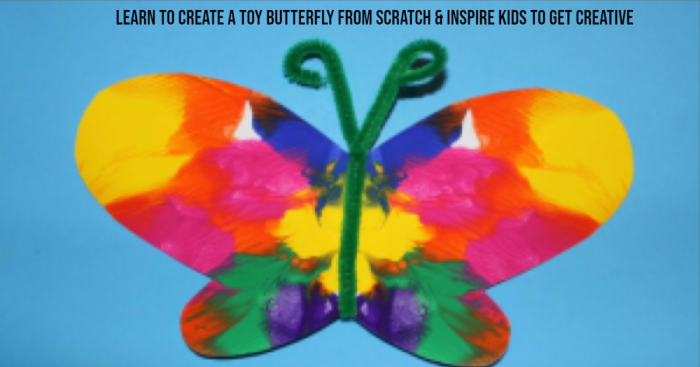
Learn to Create a Toy Butterfly from Scratch & Inspire Kids to Get Creative
When it comes to experimenting, science is always fun. But have you ever tried creating things from waste to make the environment clean? Make a toy butterfly from recycled materials.
Science experiments tell us a lot about the chemicals used and their uses in real-life applications. But not every science experiment is performed in the lab. Several easy science experiments can be tried at home along with kids. In this way, they will learn about science and its practical use and would share the results with teachers and friends.
We never realize, but sometimes these DIY projects teach us a lot. They tell us how we can protect our environment by using recycled materials. It saves money. It makes you learn a valuable skill, keeps your brain sharp, and reduces stress. You know all these things, but what about your kids? They only find these projects entertaining and an activity to do when getting bored.
So how about teaching them what they can do to save the environment with these kinds of activities? The things that were previously used in DIY seemed unusable, but now they can be recycled to get the most from it. This time we have brought an activity for kids to make a toy butterfly from scratch.
Things Required:
All you will need is a drawing sheet, pen, glue, scissors, and a few common things that can be found at home. So are you ready to train your kid what is recycling and to make the best use of it to protect the environment? Here we go.
Steps to Follow to Make a Toy Butterfly
- Take a drawing sheet and fold it equally.
- Draw butterfly wings on it (only one side wing). Make sure that you draw the wing at the corner so that it can be easily cut.
- Now open the wings and cut the colored paper into small pieces.
- You can take a different colored paper to make it look more attractive.
- With the help of glue, stick these pieces on the wings.
- Take an elastic colored band or ribbon and tie it along the wings to make its Antenna.
- You can also stick the butterfly on a stick and could use it as a decoration in your kid’s room. You are done!
Watch the Video Below to Know How to Make a Toy Butterfly from Scratch:
Source: Art and Craft Ideas for Parents & Teachers
Have fun making a flock of butterflies by using these materials. Share the video with friends and family to inspire creativity.
Use Recyclable Materials and Create The Best Out of Them
Just like you made this butterfly of paper, you can also make a butterfly or anything from the scrap metals. The recyclable materials that are left from surplus materials and vehicles can be recycled to get cheaper products. Steel is the most recycled material and can be recycled several times to get other materials combined. Check out the best uses of scrap metals to contribute positively to the environment.
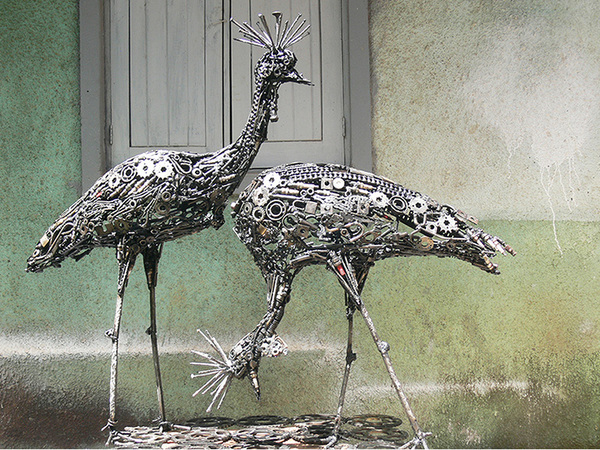
This eye-catching sculpture is made from scrap metal. Similarly, you can design these kinds of phenomenal pieces and use them in offices or homes to make them look more attractive. This is not the only way to contribute to the environment. You can also recycle old tires to help people and animals in need. See how this man used tires to create a home for stray animals. A little bit of everything that you can do can help a lot in saving the environment. Don’t wait for others, instead start yourself and be an inspiration for others.
Whether you are giving a new look to the office or planning something unique to help in making the environment clean and green, a few DIY projects let you do these. Check out another DIY project that teaches you to make colorful butterflies that can be used as a decorative piece for home, office, or as an attractive piece on the streets.
Follow These Simple Steps to Make Colorful Butterflies

- Start making butterfly by cutting the square piece of paper into half.
- Take one piece of paper and fold it into half (horizontally).
- Open the paper and fold the corners in a way that it makes a rectangle with the pointy ends.
- Fold the paper again with the colored side facing upwards.
- Now you have to concertina each side (it shouldn’t be more than 1 cm). Fold the piece into half.
- Take the second paper and make concertinas along the short width.
- Fold it into half again.
- Now join both the pieces with a ribbon.
- Yay! You are done.
Check the Video to Understand How to Make the Butterfly:
Source: Red Ted Art
We hope that you enjoy these creative DIYs as much as we do. We think that these crafts are adorable and look easier than thought. Would you try these colorful butterflies and use them to decorate your office or home? Try this fun activity along with kids and check their creativity skills. The next time, if there is any competition in their school for DIY and particularly making a butterfly, this would help them boost their confidence.
Final Words
DIY projects are always entertaining and fun to do. Have you ever done these DIY projects with your kids? If not, then how about starting it by creating these beautiful butterflies?
If you know other DIY projects that can help the environment and also fun to kids, then share your views below. You can also share your links to your DIY projects. We would love to share them.
Popular Posts
9 Most Popular Poem on Perseverance
Poems are a way to express feelings in the form of verse. Some poems are written in such a way that tells us where we are and wh...
Augustus Perez
These 13 Paintings Convey Deep Meanings In The Most Extraordinary Way
Pictures speak a thousand words for those who understand its language. But an art that depicts the same is rare to confront. Fre...
Swati Bhandari
Phoenix Bird And Its Popular Culture Adaptations
In Greek mythology, the Phoenix is a creature that resurrects from its ashes after it has ceased to exist in a show of flames. I...
Kevin Green